Project Address:
Preparation Conditions#
- A VPS, I am using Centos7 64-bit operating system
- A domain name that has been resolved
- Baota panel environment
I. Sub-Web Frontend Setup#
1. Install Baota Panel#
I won't elaborate here, please refer to: Baota Panel Installation Tutorial
2. Update the system and install Node and Yarn#
Centos
yum update -y
yum install -y curl wget sudo nodejs git
npm install -g cnpm --registry=https://registry.npm.taobao.org
# If prompted npm can not found, please use the following command to install npm and then execute the above command
yum install npm –enablerepo=epel
cnpm install -g yarn
Debian/Ubuntu
apt-get update -y
apt-get install -y curl wget sudo nodejs git
npm install -g cnpm --registry=https://registry.npm.taobao.org
cnpm install -g yarn
After the commands are executed, please run the following code to check if Node and Yarn are installed successfully. If successful, it will return the version number.
node -v
#yum install npm –enablerepo=epel
yarn --version
3. Download and Install Sub-Web#
Pull the sub-web program and enter the sub-web folder
git clone https://github.com/CareyWang/sub-web.git
cd sub-web
Install build dependencies in the project directory; the build process takes a little longer
yarn install
Run the web client using webpack for local development
bash
yarn serve
If the following image appears, it indicates that the frontend debugging mode has started successfully.

At this point, we should be able to preview the frontend sub-web by visiting http://server_ip:8080/ in our browser.
(Remember to open the firewall and security group for port 8080)
4. Modify the Default Backend Address and Add Remote Rules#
Find the VPS file /root/sub-web/src/views/Subconverter.vue
Locate backendOptions and input your resolved backend address. The domain name is the backend domain name you prepared earlier; change http to https and add the suffix /sub?.
After finding remoteConfig: [ , press Enter and copy the following rules into it
{
    label: "ACL4SSR",
    options: [
        {
            label: "ACL4SSR_Online Default Version Group Comparison (Synchronized with Github)",
            value: "https://raw.githubusercontent.com/ACL4SSR/ACL4SSR/master/Clash/config/ACL4SSR_Online.ini"
        },

        {
            label: "ACL4SSR_Online_AdblockPlus More Ad Blocking (Synchronized with Github)",
            value: "https://raw.githubusercontent.com/ACL4SSR/ACL4SSR/master/Clash/config/ACL4SSR_Online_AdblockPlus.ini"
        },

        {
            label: "ACL4SSR_Online_NoAuto No Automatic Speed Test (Synchronized with Github)",
            value:"https://raw.githubusercontent.com/ACL4SSR/ACL4SSR/master/Clash/config/ACL4SSR_Online_NoAuto.ini"
        },

        {
            label: "ACL4SSR_Online_NoReject No Ad Blocking Rules (Synchronized with Github)",
            value:"https://raw.githubusercontent.com/ACL4SSR/ACL4SSR/master/Clash/config/ACL4SSR_Online_NoReject.ini"
        },

        {
            label: "ACL4SSR_Online_Mini Simplified Version (Synchronized with Github)",
            value:"https://raw.githubusercontent.com/ACL4SSR/ACL4SSR/master/Clash/config/ACL4SSR_Online_Mini.ini"
      },

      {
            label: "ACL4SSR_Online_Mini_AdblockPlus.ini Simplified Version More Ad Blocking (Synchronized with Github)",
            value:"https://raw.githubusercontent.com/ACL4SSR/ACL4SSR/master/Clash/config/ACL4SSR_Online_Mini_AdblockPlus.ini"
      },

      {
            label: "ACL4SSR_Online_Mini_NoAuto.ini Simplified Version No Automatic Speed Test (Synchronized with Github)",
            value:"https://raw.githubusercontent.com/ACL4SSR/ACL4SSR/master/Clash/config/ACL4SSR_Online_Mini_NoAuto.ini"
      },

      {
            label: "ACL4SSR_Online_Mini_Fallback.ini Simplified Version with Failover (Synchronized with Github)",
            value:"https://raw.githubusercontent.com/ACL4SSR/ACL4SSR/master/Clash/config/ACL4SSR_Online_Mini_Fallback.ini"
      },

      {
            label: "ACL4SSR_Online_Mini_MultiMode.ini Simplified Version Automatic Speed Test, Failover, Load Balancing (Synchronized with Github)",
            value:"https://raw.githubusercontent.com/ACL4SSR/ACL4SSR/master/Clash/config/ACL4SSR_Online_Mini_MultiMode.ini"
      },

      {
          label: "ACL4SSR_Online_Full Full Group Heavy User Use (Synchronized with Github)",
          value:"https://raw.githubusercontent.com/ACL4SSR/ACL4SSR/master/Clash/config/ACL4SSR_Online_Full.ini"
      },

      {
          label: "ACL4SSR_Online_Full_NoAuto.ini Full Group No Automatic Speed Test Heavy User Use (Synchronized with Github)",
          value:"https://raw.githubusercontent.com/ACL4SSR/ACL4SSR/master/Clash/config/ACL4SSR_Online_Full_NoAuto.ini"
      },

      {
          label: "ACL4SSR_Online_Full_AdblockPlus Full Group Heavy User Use More Ad Blocking (Synchronized with Github)",
          value:"https://raw.githubusercontent.com/ACL4SSR/ACL4SSR/master/Clash/config/ACL4SSR_Online_Full_AdblockPlus.ini"
      },

      {
          label: "ACL4SSR_Online_Full_Netflix Full Group Heavy User Use Netflix Full (Synchronized with Github)",
          value:"https://raw.githubusercontent.com/ACL4SSR/ACL4SSR/master/Clash/config/ACL4SSR_Online_Full_Netflix.ini"
      },

      {
          label: "ACL4SSR Local Default Version Group Comparison",
          value: "config/ACL4SSR.ini"
      },

      {
          label: "ACL4SSR_Mini Local Simplified Version",
          value: "config/ACL4SSR_Mini.ini"
      },

      {
          label: "ACL4SSR_Mini_NoAuto.ini Local Simplified Version + No Automatic Speed Test",
          value: "config/ACL4SSR_Mini_NoAuto.ini"
      },

      {
          label: "ACL4SSR_Mini_Fallback.ini Local Simplified Version + Fallback",
          value: "config/ACL4SSR_Mini_Fallback.ini"
      },

      {
          label: "ACL4SSR_BackCN Local Return to China",
          value: "config/ACL4SSR_BackCN.ini"
      },

      {
          label: "ACL4SSR_NoApple Local No Apple Routing",
          value: "config/ACL4SSR_NoApple.ini"
      },

      {
            label: "ACL4SSR_NoAuto Local No Automatic Speed Test ",
            value: "config/ACL4SSR_NoAuto.ini"
      },

      {
            label: "ACL4SSR_NoAuto_NoApple Local No Automatic Speed Test & No Apple Routing",
            value: "config/ACL4SSR_NoAuto_NoApple.ini"
      },

      {
            label: "ACL4SSR_NoMicrosoft Local No Microsoft Routing",
            value: "config/ACL4SSR_NoMicrosoft.ini"
      },

      {
            label: "ACL4SSR_WithGFW Local GFW List",
            value: "config/ACL4SSR_WithGFW.ini"
      }
    ]
  },
5. Package the Website After Configuration#
After configuration, the program will automatically update. Refresh the frontend webpage again, and the related rules added earlier will appear, as shown in the image:
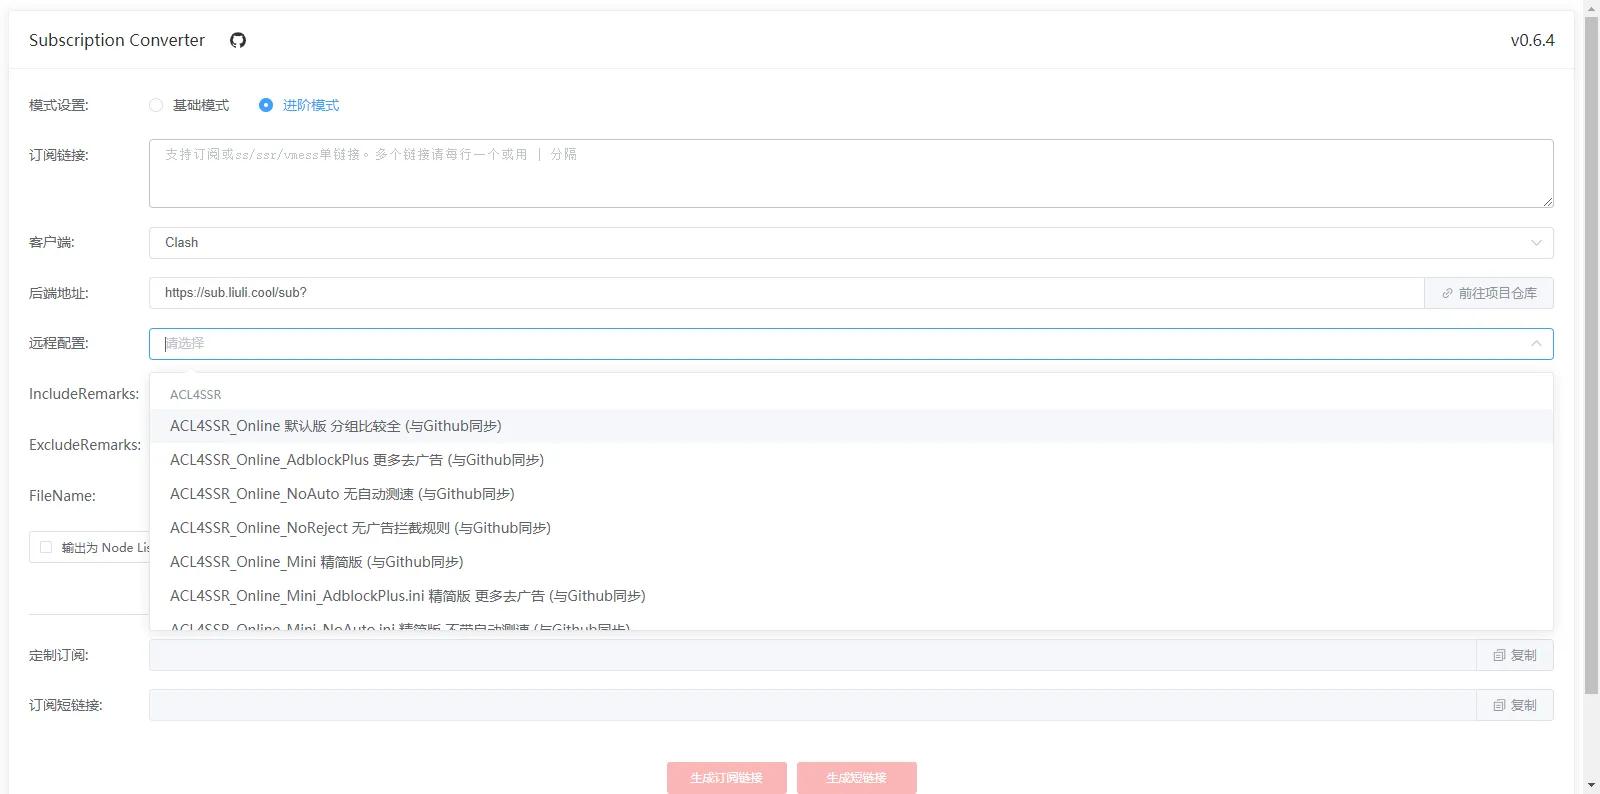
As shown in the image, the default backend address and the original program configuration rules have been modified.
At this point, our frontend debugging is complete, and we now need to package it to generate a release directory and publish it.
First, stop the debugging program, CTRL+C, exit the current debugging, and then execute the following command to package:
yarn build
Execute the following packaging command, a dist directory will be generated under /root/sub-web, which is the release directory for the webpage.
Copy the files inside this directory to the root directory of your site.
6. Publish the Frontend#
In the Baota panel, click to add a site and add the frontend site, and configure the SSL certificate.
Copy all files from the /root/sub-web/dist folder to the root directory of the frontend site.
When accessing the website, if the following image appears, the frontend is successfully deployed.
7. Add Redirection Rules#
location /sub{
    proxy_pass http://127.0.0.1:25500;
    proxy_set_header Host $host;
    proxy_set_header X-Real-IP $remote_addr;
    proxy_set_header X-Forwarded-For $proxy_add_x_forwarded_for;
    proxy_set_header REMOTE-HOST $remote_addr;
    add_header X-Cache $upstream_cache_status;
    #Set Nginx Cache
    add_header Cache-Control no-cache;
    expires 12h;
}
II. SubConverter Backend Setup#
1. Download and Unzip Subconverter Binary File#
cd /root
wget https://github.com/tindy2013/subconverter/releases/download/v0.7.2/subconverter_linux64.tar.gz
tar -zxvf subconverter_linux64.tar.gz
After completion, a subconverter folder will appear in the /root folder, which is our backend program.
2. Modify Configuration File Parameters#
Now we need to modify some parameters in the backend configuration file.
Find the VPS file /root/subconverter/pref.ini, locate the following parameters and modify them
api_access_token=123123dfsdsdfsdfsdf            # Set to anything you know
managed_config_prefix=https://sub.yourdomin.com  # Set to the domain name we just resolved
listen=127.0.0.1                                # Change this to 127.0.0.1 for reverse proxy
3. Create Service Process and Start#
Next, we need to create a service so that the VPS automatically runs the backend program every time it restarts or powers on.
Find the VPS directory /etc/systemd/system, create a file named sub.service.
Open the file, paste the following content, and save.
[Unit]
Description=A API For Subscription Convert
After=network.target

[Service]
Type=simple
ExecStart=/root/subconverter/subconverter
WorkingDirectory=/root/subconverter
Restart=always
RestartSec=10

[Install]
WantedBy=multi-user.target
4. Check Running Status and Set to Start on Boot#
systemctl daemon-reload
systemctl start sub
systemctl enable sub
systemctl status sub
At this point, the backend setup is complete!